Installing the Bot
Who can install Frogge in a server?
To invite Frogge, you'll need the MANAGE_SERVER permission in the target Discord server.
Once the app is installed, admin access is a bit more flexible than just Manage Server. See Permissions for the full picture, including how to grant specific members admin access without giving them MANAGE_SERVER.
Installation
Invite Frogge to your server →
Discord will walk you through picking a server and show you the permissions Frogge is requesting before you confirm.
Application Permissions
Please note that Frogge requires the ADMINISTRATOR permission to function. This is due to the wide range of features that the app offers and the permissions required to manage them. We don't take this permission lightly and welcome all questions regarding the proper use and distribution of permissions.
First-time setup
Frogge doesn't have a separate "setup wizard": your server registers itself automatically the moment it joins, at the same time as posting a welcome message introducing itself and listing a few commands members can use right away (/vip-status, /verify, /profile, /staffing-status). It posts to your server's System Channel if one's set and Frogge can post there, otherwise the first channel it can post in.
Screenshot needed
The welcome message posted on join / re-posted by /setup.
Missed it, or want it somewhere else? Re-post it any time with
/setup (optionally
/setup channel:#somewhere to pick a channel other than the System Channel).
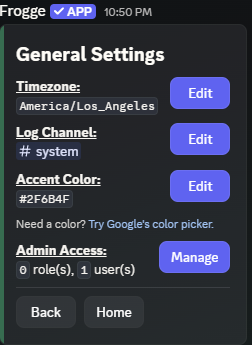
The simplest first real configuration step is to set your venue's timezone, which every other module (event times, VIP expirations) depends on:
/admin menu → →
→ next to
Timezone, then pick from a searchable list of named zones (e.g. US/Eastern), each showing its
current UTC offset.
General Settings also covers your Log Channel (where the bot posts admin activity like new profile submissions) and Accent Color, plus Admin Access. See Permissions.
Screenshot needed
The timezone Select screen.
Opening the admin dashboard
Everything else is managed from one command:
/admin menu opens a two-level menu: first a list of four categories, each with an Open button; opening one shows that category's own list of modules, each also with its own Open button leading to that module's actual menu.
- Venue Operations: Events, Finance, Positions, Staffing, Time Clock, VIP.
- Community & Engagement: Forms, Leveling, Profiles, Reaction Roles, Verification.
- Promotions & Contests: Giveaways, Raffles, Stream Alerts, Tournaments. (Cards would normally be here too, but it's currently disabled; see the note below.)
- Utilities: Audit Log, Auto-Reactor, Autoroles, Embeds, Glyph Builder, Sticky Messages.
sits below the four categories as its own button, not nested inside any of them. See Features for what's inside each module (a few of the categories above include newer modules that don't have their own page here yet). This command is visible to every member, but only admins (see Permissions) can actually use it.
Note
Cards is temporarily disabled in Discord: its entry doesn't currently appear in Promotions & Contests at all. It's still fully available on the Dashboard in the meantime. See Surface Coverage for the full picture of what's available where.
Screenshot needed
The category list and an opened category showing its modules.
Next steps
- Set up your Position catalog first, since Events and Staffing both reference it.
- Create your first Event.
- Set up VIP tiers if your venue runs a VIP program.
- Profiles needs no setup: members can start building characters with /profile right away.
- Giveaways and Raffles for prize draws, Staffing for a real employment roster, and Verification if you want members to prove FFXIV character ownership before getting a role.
- Prefer a browser? See Accessing the Dashboard.